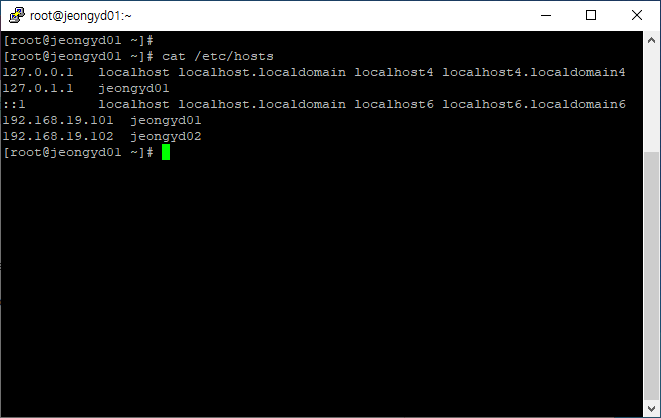
1. cluster 구성할 각 노드의 ip 주소를 설정하며, /etc/hosts에 각 노드를 등록합니다.
[root@jeongyd01 ~]# cat /etc/hosts
127.0.0.1 localhost localhost.localdomain localhost4 localhost4.localdomain4
127.0.1.1 jeongyd01
::1 localhost localhost.localdomain localhost6 localhost6.localdomain6
192.168.19.101 jeongyd01
192.168.19.102 jeongyd02
2. cluster 패키지 설치
[root@jeongyd01 ~]# yum install -y pacemaker corosync pcs
3. 방화벽 설정
[root@jeongyd01 ~]# firewall-cmd --permanent --add-service=high-availability
4. 데몬 시작
[root@jeongyd01 ~]# systemctl start pcsd.service
[root@jeongyd01 ~]# systemctl enable pcsd.service
5. 클러스터 계정 설정
[root@jeongyd01 ~]# passwd hacluster
Changing password for user hacluster.
New password:
Retype new password:
passwd: all authentication tokens updated successfully.
6. hacluster를 클러스터의 각 노드에 대해 인증
[root@jeongyd01 ~]# pcs cluster auth jeongyd01 jeongyd02
Username: hacluster
Password:
jeongyd01: Authorized
Error: Unable to communicate with jeongyd02

여기서 jeongyd01, jeongyd02 간의 인증이 커뮤니케이션 문제로 실패합니다.
실패한 원인은 방화벽 문제로 아래 포트를 열어줘야 합니다.
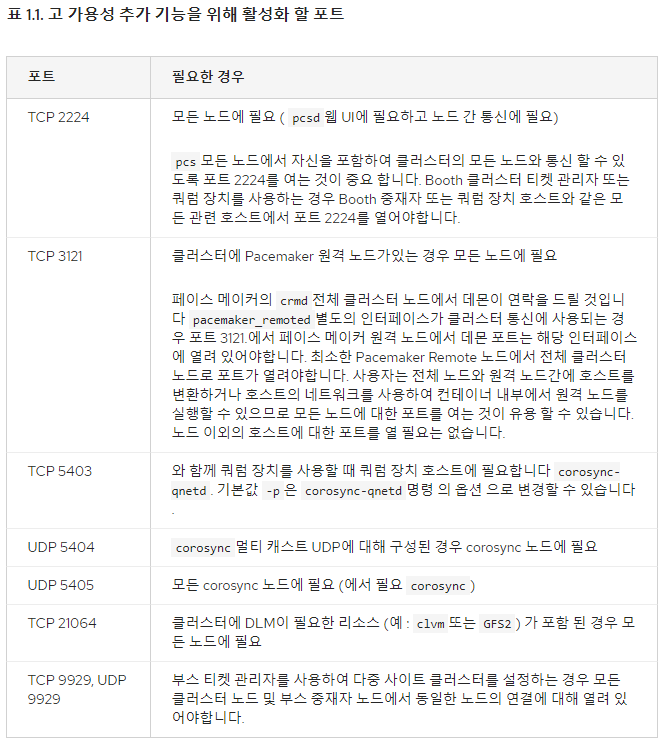
[root@jeongyd01 ~]# firewall-cmd --zone=public --permanent --add-port=2224/tcp;
success
[root@jeongyd01 ~]# firewall-cmd --zone=public --permanent --add-port=3121/tcp;
success
[root@jeongyd01 ~]# firewall-cmd --zone=public --permanent --add-port=5403/tcp;
success
[root@jeongyd01 ~]# firewall-cmd --zone=public --permanent --add-port=21064/tcp;
success
[root@jeongyd01 ~]# firewall-cmd --zone=public --permanent --add-port=9929/tcp;
success
[root@jeongyd01 ~]# firewall-cmd --zone=public --permanent --add-port=5404/udp;
success
[root@jeongyd01 ~]# firewall-cmd --zone=public --permanent --add-port=5405/udp;
success
[root@jeongyd01 ~]# firewall-cmd --zone=public --permanent --add-port=9929/udp;
success
[root@jeongyd01 ~]# firewall-cmd --reload
success
[root@jeongyd01 ~]# firewall-cmd --zone=public --list-all
방화벽 오픈후 reload 후 오픈된 리스트를 확인 합니다.

양쪽 노드 다 오픈후 다시 인증 시도

7. 클러스터 생성
[root@jeongyd01 ~]# pcs cluster setup --name jeongyd_cluster jeongyd01 jeongyd02

8. 클러스터 실행
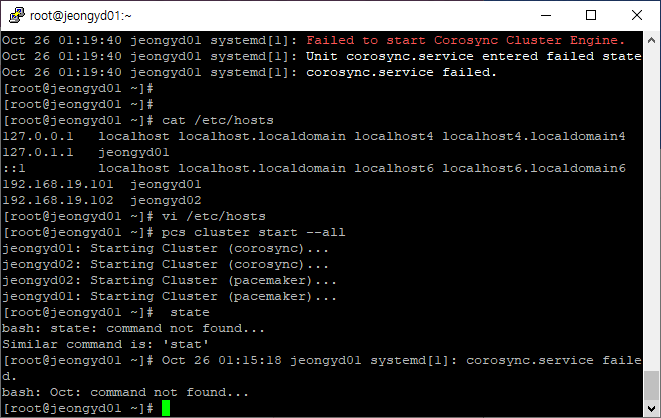
[root@jeongyd01 ~]# pcs cluster start --all
jeongyd01: Error connecting to jeongyd01 - (HTTP error: 400)
jeongyd02: Error connecting to jeongyd02 - (HTTP error: 400)
Error: unable to start all nodes
jeongyd01: Error connecting to jeongyd01 - (HTTP error: 400)
jeongyd02: Error connecting to jeongyd02 - (HTTP error: 400)
에러 발생되며 클러스터 실행 실패합니다.
[root@jeongyd01 ~]# cat /etc/hosts
127.0.0.1 localhost localhost.localdomain localhost4 localhost4.localdomain4
127.0.1.1 jeongyd01 > /etc/hosts 파일의 이 부분을 제거하여 해결
::1 localhost localhost.localdomain localhost6 localhost6.localdomain6
192.168.19.101 jeongyd01
192.168.19.102 jeongyd02

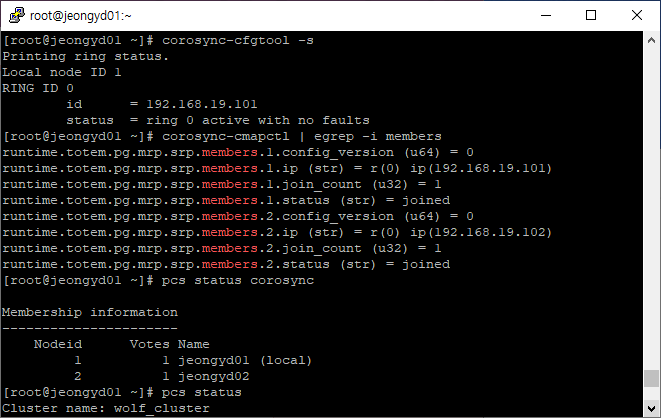
9. 클러스터 통신을 확인
[root@jeongyd01 ~]# corosync-cfgtool -s
멤버쉽과 쿼럼을 확인
[root@jeongyd01 ~]# corosync-cmapctl | egrep -i members
corosync 상태확인
[root@jeongyd01 ~]# pcs status corosync
클러스터 상태 확인
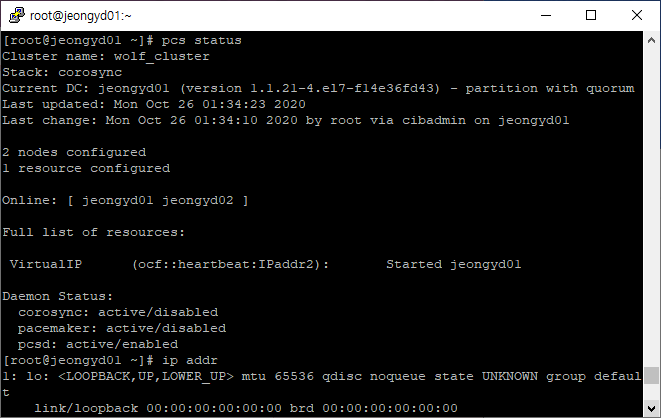
[root@jeongyd01 ~]# pcs status

10. Active/Passive 클러스터 생성
클러스터 설정을 변경하기 전에 아래처럼 crm_verify 명령어로 유효성을 확인해 두는 것이 좋다. STONITH 부분에서 오류가 발생한다.
[root@jeongyd01 ~]# crm_verify -L -V
error: unpack_resources: Resource start-up disabled since no STONITH resources have been defined
error: unpack_resources: Either configure some or disable STONITH with the stonith-enabled option
error: unpack_resources: NOTE: Clusters with shared data need STONITH to ensure data integrity
Errors found during check: config not valid
데이타의 무결성을 확보하기 위해 기본으로 STONITH가 활성화되어 있는데 이것을 비활성하고 다시 확인해보면 아무런 오류가 발생하지 않는다.
[root@jeongyd01 ~]# pcs property set stonith-enabled=false
[root@jeongyd01 ~]# crm_verify -L

11. 가상 IP 리소스 생성
가상아이피를 리소스로 추가. 가상아이피는 노드가 다운되면 다른 노드로 이동하며, 실제로 서비스에 이용되는 IP 주소로 이용.
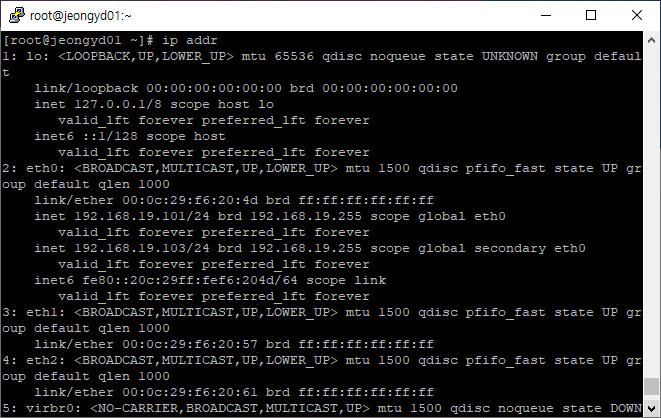
[root@jeongyd01 ~]# pcs resource create VirtualIP ocf:heartbeat:IPaddr2 ip=192.168.19.103 cidr_netmask=24 op monitor interval=30s
위에서 추가한 리소스 VirtualIP는 세 부분 ocf:heartbeat:IPaddr2 의 형태로 구분했다. 여기에서, 첫번째 필드는 resource standard 두번째 필드는 표준에 따라 다르며 세번째 필드는 리소스 스크립트의 이름이다.
[root@jeongyd01 ~]# pcs status
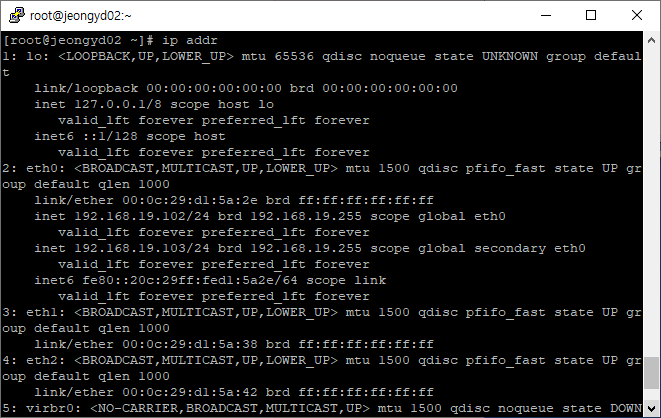
[root@jeongyd01 ~]# ip addr
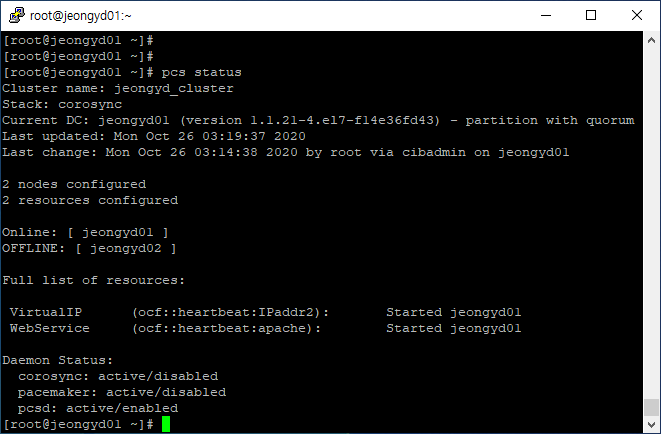
12. Failover test
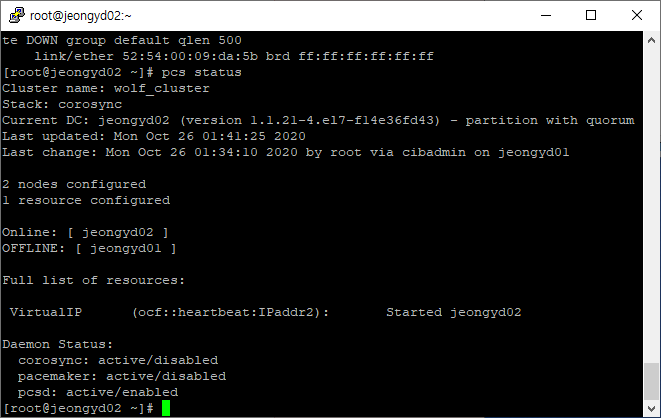
[root@jeongyd01 ~]# pcs cluster stop jeongyd01
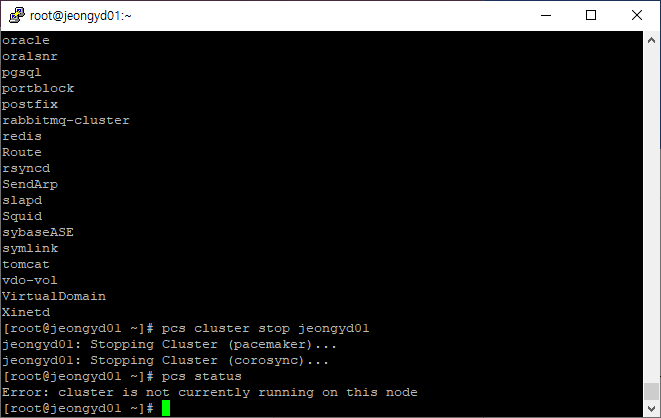
jeongyd01 offline에 VritualIP 서비스가 jeongyd02로 넘어 감을 확인
jeongyd01 다시 cluster start
[root@jeongyd01 ~]# pcs cluster start jeongyd01

resource stickniess – 자원의 이동에는 대부분 가동중지 시간이 필요하며, 데이타베이스처럼 복잡한 서비스는 이 시간이 길어질 수 있다. 이 문제를 해결하기위해서 pacemaker에서 제공하는 개념이 리소스 stickiness. 기본값은 0 이지만, 이 숫자를 늘여서 서비스가 이동하는 것을 제어할 수 있다.
[root@jeongyd01 ~]# pcs resource defaults
No defaults set
[root@jeongyd01 ~]# pcs resource defaults resource-stickiness=60
Warning: Defaults do not apply to resources which override them with their own defined values
[root@jeongyd01 ~]# pcs resource defaults
resource-stickiness=60

13. 클러스터 서비스로 아파치 웹서버 등록하기
/var/www/html/index.html 파일을 만든다.
/etc/httpd/conf.d/status.conf 파일에 아래 내용을 입력한다(양쪽 노드 모두).
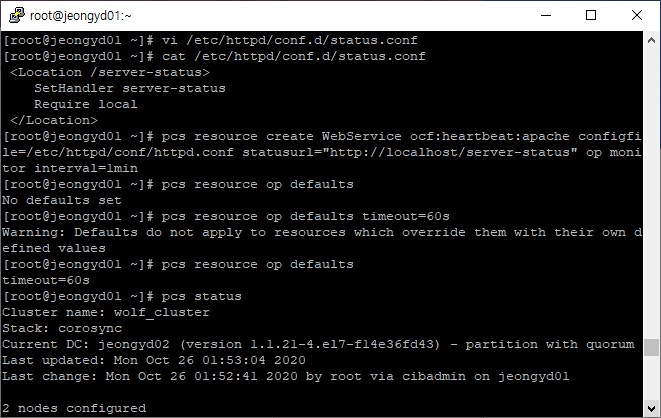
[root@jeongyd01 ~]# vi /etc/httpd/conf.d/status.conf
[root@jeongyd01 ~]# cat /etc/httpd/conf.d/status.conf
<Location /server-status>
SetHandler server-status
Require local
</Location>
[root@jeongyd01 ~]# pcs resource create WebService ocf:heartbeat:apache configfile=/etc/httpd/conf/httpd.conf statusurl="http://localhost/server-status" op monitor interval=1min
[root@jeongyd01 ~]# pcs resource op defaults
No defaults set
[root@jeongyd01 ~]# pcs resource op defaults timeout=60s
Warning: Defaults do not apply to resources which override them with their own defined values
[root@jeongyd01 ~]# pcs resource op defaults
timeout=60s
[root@jeongyd01 ~]# pcs status

WebService가 정상동작 하지 않음을 확인하였다.
문제의 원인은 CentOS 7/RHEL 7 에서 Apache PID file이 /var/run/httpd/httpd.pid에 있지만, pacemaker는 PID를 /var/run/httpd.pid에서 찾기 때문에 아래 스크립트로 해결하였다.
[root@jeongyd01 ~]# /bin/sed -i 's/RUNDIR\/${httpd_basename}.pid/RUNDIR\/${httpd_basename}\/${httpd_basename}.pid/g' /usr/lib/ocf/lib/heartbeat/apache-conf.sh
출처: <https://serverfault.com/questions/915716/apache-failed-to-start-in-pacemaker>
Apache Failed to Start in Pacemaker
I am using Pacemaker with Corosync to set up a basic Apache HA cluster with 3 nodes running CentOS. For some reasons, I cannot get the apache resource started in pcs. Cluster IP: 192.168.200.40 ...
serverfault.com
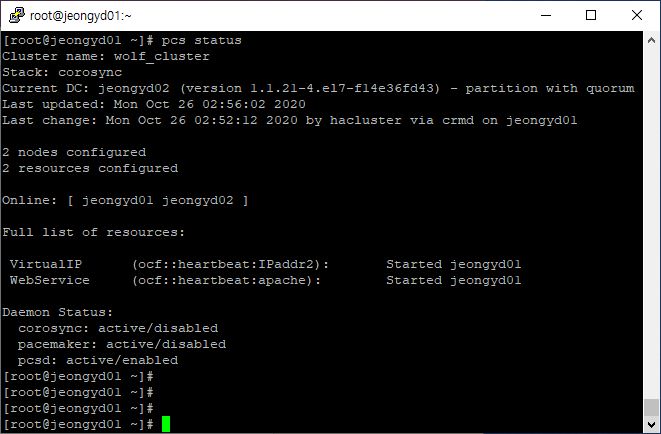
정상 동작을 확인
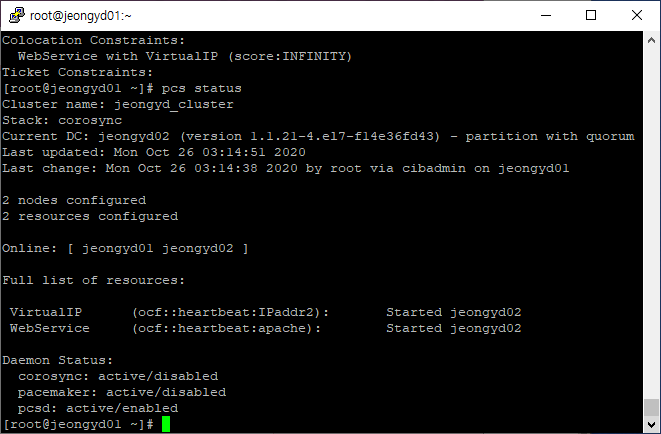
14. resources 통합
VritualIP는 jeongyd01 WebService는 jeongyd02에서 실행중이다.
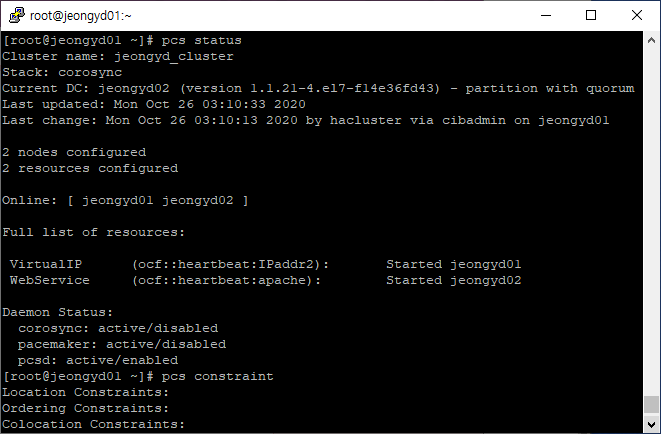
colocation constraint 두 리소스를 묶어줌으로써 해결된다.
[root@jeongyd01 ~]# pcs constraint colocation add WebService with VirtualIP INFINITY
[root@jeongyd01 ~]# pcs constraint
설정값 확인

어떤 서비스가 먼저 실행되고 난 이후 서비스가 실행되어야 할 필요가 있을때는 아래와 같은 방법을 사용한다. 아래는 VirtualIP가 먼저 실행된 후 WebService가 실행되도록 한다.
[root@jeongyd01 ~]# pcs constraint order VirtualIP then WebService
Adding VirtualIP WebService (kind: Mandatory) (Options: first-action=start then-action=start)
[root@jeongyd01 ~]# pcs constraint

15. 수동으로 리소스 강제 이동하기
리소스를 강제로 다른 노드로 이동하기 위해서는 constraint location의 스코어를 INFINITY로 변경하면된다. 아래는 WebService 리소스를 jeongyd02 노드로 강제 이동하는 명령어이다.
[root@jeongyd01 ~]# pcs constraint location WebService prefers jeongyd02=INFINITY
[root@jeongyd01 ~]# pcs constraint

아래 블로그 및 redhat 공식 사이트를 참고하였습니다.
https://blog.boxcorea.com/wp/archives/1784
리눅스 HA(corosync, pacemaker) – Part 1
리눅스 HA 구성(CentOS7, corosync, pacemaker 이용) corosync와 pacemaker를 이용하여 리눅스 HA 클러스터를 구성한다. Corosync – 클러스터의 저수준 인프라를 제공하며, 클러스터에 대한 쿼럼정보, 멤버쉽, 안
blog.boxcorea.com
1장. 페이스메이커(Pacemaker)를 사용한 Red Hat 고가용성 클러스터 생성 Red Hat Enterprise Linux 7 | Red Hat C
The Red Hat Customer Portal delivers the knowledge, expertise, and guidance available through your Red Hat subscription.
access.redhat.com
'Linux' 카테고리의 다른 글
| [Linux] RHCSA Linux root password 재설정 (0) | 2020.11.19 |
|---|---|
| [Linux] RHCSA GUI 환경으로 전환 (0) | 2020.11.18 |
| [Linux] CentOS 7 Kernel 4.12 업그레이드 (0) | 2017.08.14 |
| [Linux] CentOS 7 Kernel 업데이트 (0) | 2017.08.12 |
| [Linux] CentOS 7 Apache, PHP, MariaDB 연동 (0) | 2017.08.06 |
